Microsoft Defender, formerly known as Windows Defender, has come a long way since its early days as a basic, often-ridiculed default solution. In 2025, it stands as a powerful, fully integrated security tool that delivers robust protection for the vast majority of Windows users — completely free, seamlessly built into Windows 10 and 11, and equipped with real-time protection, ransomware defense, and a solid firewall. Unlike third-party antivirus programs, nothing needs to be purchased or separately installed. Microsoft updates Defender several times a week to stay ahead of new threats, and it runs quietly in the background without noticeably slowing down your system.
That said, the right configuration makes all the difference. Out of the box, Defender provides a solid baseline, but features like ransomware protection, scheduled scans, and cloud-based detection only reach their full potential once properly activated. This guide walks you through each step clearly and without unnecessary technical jargon — so you can secure your PC effectively, even without prior IT knowledge.
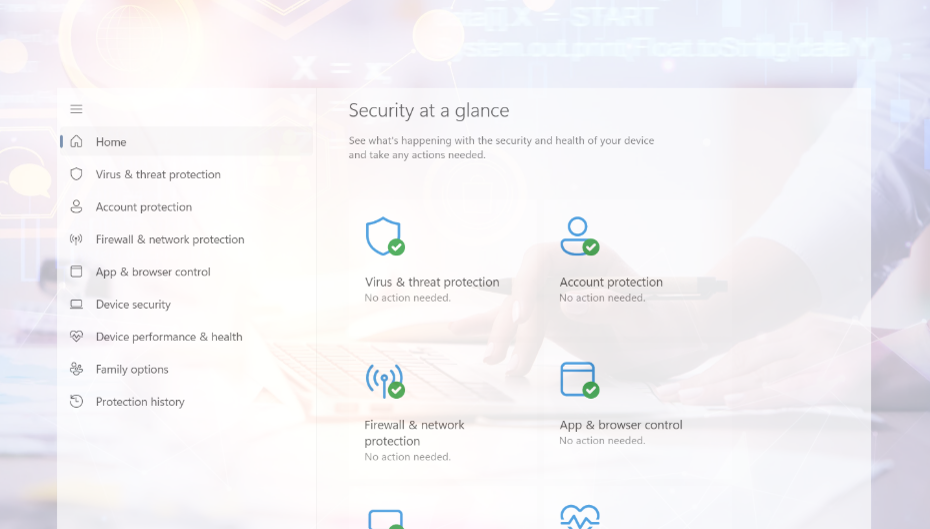
1. Make sure Windows Defender is active
The first step is confirming that Defender is actually running. To do this, press Windows Key + I to open Settings, navigate to Update & Security, then select Windows Security from the left menu, and click on Virus & threat protection. Under Manage Settings, you’ll find the core toggle switches — make sure Real-time protection, Cloud-based protection, and Automatic sample submission are all turned on.
One important thing to watch out for: if you have a third-party antivirus program installed (such as Norton, McAfee, or Kaspersky), Windows will automatically disable Defender to avoid conflicts. You can check whether Defender appears as the active antivirus in Windows Security. If you prefer to use Defender, uninstall the third-party software via Settings > Apps > Apps & Features, and Defender will re-enable itself automatically. For most home users, Defender is fully sufficient. For businesses handling sensitive data, specialized solutions like Bitdefender or Norton may offer additional features worth considering.
It’s also worth rechecking these settings after major Windows updates, as they can occasionally reset. If Defender remains disabled even without third-party software, this could be a sign of malware or corrupted system files — in that case, run a Microsoft Defender Offline Scan or use the sfc /scannow command in the command prompt.
2. Enable real-time protection and cloud protection
Real-time protection is the heart of Defender. It continuously monitors your system and scans files, programs, and downloads the moment you access them — catching threats as they happen, rather than after the fact. You’ll find the toggle under Virus & threat protection > Manage Settings. On modern hardware, the performance impact is barely noticeable.
Cloud-based protection works alongside real-time scanning by comparing suspicious activity against Microsoft’s continuously updated online threat database. This is especially valuable for detecting zero-day attacks — threats so new that they aren’t yet in Defender’s local signature database. It does require an active internet connection, but the added detection capability is well worth it.
Automatic sample submission rounds out the picture: when Defender encounters a suspicious file it can’t confidently classify, it can send that file to Microsoft for further analysis. This improves detection rates across all Defender users over time. Microsoft transmits only metadata rather than personal information, but you can disable this feature if privacy is a concern — just be aware it may reduce the catch rate for brand-new threats. All three of these settings are enabled by default, but it’s a good habit to verify them after a fresh Windows install or a major update.
3. Schedule Regular Scans
Defender runs automatic background scans, but setting up additional scheduled or manual scans adds an extra layer of assurance — particularly for areas that quick background checks might miss.
For a manual scan, open Windows Security, click Virus & threat protection, and hit Quick Scan for a fast check of the most critical system areas. For a more thorough sweep, click Scan Options. A Full Scan examines every file and folder on your system and can take anywhere from 30 minutes to a few hours depending on storage size — it’s worth running if you haven’t done one recently. The Custom Scan lets you target a specific folder or drive, such as a newly connected USB stick or your Downloads folder. The Windows Defender Offline Scan is the most powerful option: it restarts your PC and scans the system before Windows even loads, making it highly effective against stubborn malware that would otherwise hide from detection.
For automatic scheduled scans, open the Task Scheduler (search for it in the Start menu), and navigate to Microsoft > Windows > Windows Defender. Double-click Windows Defender Scheduled Scan, go to the Triggers tab, click New, and set a weekly schedule — for example, every Sunday at 3:00 PM. A weekly full scan is a sensible balance between thoroughness and convenience for most users.
4. Use ransomware protection
Ransomware is one of the most damaging threats facing both individuals and businesses. Once it infiltrates a system, it encrypts documents, photos, and other important files, then demands payment — usually in cryptocurrency — for the decryption key. Even victims who pay often don’t recover their data.
Defender counters this with Controlled Folder Access, a feature that prevents unauthorized programs from making changes to protected folders. To enable it, go to Virus & threat protection, scroll down to Manage Ransomware Protection, and switch Controlled Folder Access on. By default, Windows protects common folders like Documents, Pictures, Videos, and the Desktop. You can extend this protection to other sensitive locations — such as project folders, invoice archives, or external drives — by clicking Protected Folders and adding them manually.
Keep in mind that some legitimate programs may initially be blocked from accessing protected folders. If you receive a warning, you can grant specific apps permission through “Allow an app through Controlled Folder Access” without compromising the protection itself.
5. Keep Windows and Defender up to date
Antivirus protection is only as effective as its threat signatures — the detection data Defender uses to identify malicious software. New threats emerge daily, which means keeping both Windows and Defender current is essential.
The good news is that Defender updates automatically as part of Windows Update. To check manually, press Windows Key + I, go to Update & Security > Windows Update, and click Check for updates. For Defender-specific updates, open Windows Security, select Virus & threat protection, and look for the update timestamp under Virus & threat protection updates. If the last update was more than a day or two ago, click Check for updates to fetch the latest signatures immediately.
If your PC hasn’t been turned on for a while, running an update before going online is a simple but important precaution. Outdated definitions can leave gaps in protection that new malware is specifically designed to exploit.
6. Configure the firewall
The Windows Defender Firewall monitors data traffic between your PC and the internet, blocking unauthorized access from outside and ensuring that programs only communicate online when permitted. A properly configured firewall is especially important when connecting to public Wi-Fi networks such as those in cafés, hotels, or airports.
To check your firewall status, open Windows Security and click Firewall & Network Protection. You’ll see three network profiles: Domain (typically used in corporate environments), Private (your home or trusted network), and Public (any unknown network). All three should display “Firewall is on” — if any one of them doesn’t, enable it immediately.
If a specific program is being incorrectly blocked, you can adjust access rules by clicking Allow an app through the firewall, then modifying the checkboxes for Private and Public network access. Be conservative with Public access in particular, as it applies to untrusted networks. It’s worth emphasizing: the firewall should never be turned off entirely. If a program isn’t working as expected, investigate the specific access rules rather than disabling protection across the board.
7. Complement protection with safe behavior
Even the most carefully configured antivirus cannot block every threat. The way you handle emails, files, passwords, and online accounts is just as important as any technical safeguard.
The most common entry point for malware is still email. If you receive an attachment from an unknown sender — or even from a familiar one if the message seems off — don’t open it without verifying first. Phishing emails often impersonate banks, courier services, or government agencies and are designed to look convincing. Always check the actual sender address, look for subtle spelling errors or unusual phrasing, and navigate to websites directly in your browser rather than clicking embedded links.
When installing software, stick to official websites and trusted app stores like the Microsoft Store. “Free” downloads from unknown sources frequently bundle malware that installs silently alongside the advertised program. The same caution applies to updates: always use the built-in update functions of your applications rather than third-party download sites.
Strong passwords are another fundamental layer of protection. Use at least 12 characters combining upper and lowercase letters, numbers, and special characters, and avoid personal information like birthdays or names. Crucially, each account should have a unique password — if one service is breached, you don’t want attackers gaining access to everything else. A password manager can handle the complexity for you.
Finally, enable two-factor authentication (2FA) wherever possible, especially for email, banking, and social media. Even if your password is stolen, an attacker still cannot log in without the second factor — typically a code delivered via SMS or an authenticator app. It’s one of the most effective security upgrades available, and it takes only a few minutes to set up.
Conclusion – Setting up Windows Defender step by step guide
With the right settings in place, Windows Defender provides reliable, up-to-date protection for your PC at no cost and with minimal maintenance. The key components — real-time protection, cloud-based detection, ransomware protection via Controlled Folder Access, an active firewall, and scheduled scans — together cover the most important security bases. Regular Windows updates keep the threat signatures current, and smart habits online take care of the rest.
The goal is to configure everything properly once, then let the automatic processes do their job. Check the settings periodically, run an offline scan if anything seems wrong, and you’ll have a well-protected system that stays that way over the long term.
Found this guide helpful? Follow me on LinkedIn for more practical cybersecurity tips — or drop me your Windows Defender questions directly there.
I also recommend you to read the following articels:
The Antivirus Trap: Why Your Protection Is Just an Illusion
When does Microsoft Defender Business make sense for you and your company?